Integrations
The Integrations settings page is where you connect NexusRMS to third-party services. Each integration is presented as a card showing its connection status and key details. From here you can connect accounting platforms, your WordPress website, calendar services, and manage API access for custom integrations.
Navigate to Configuration > Integrations to access this page.
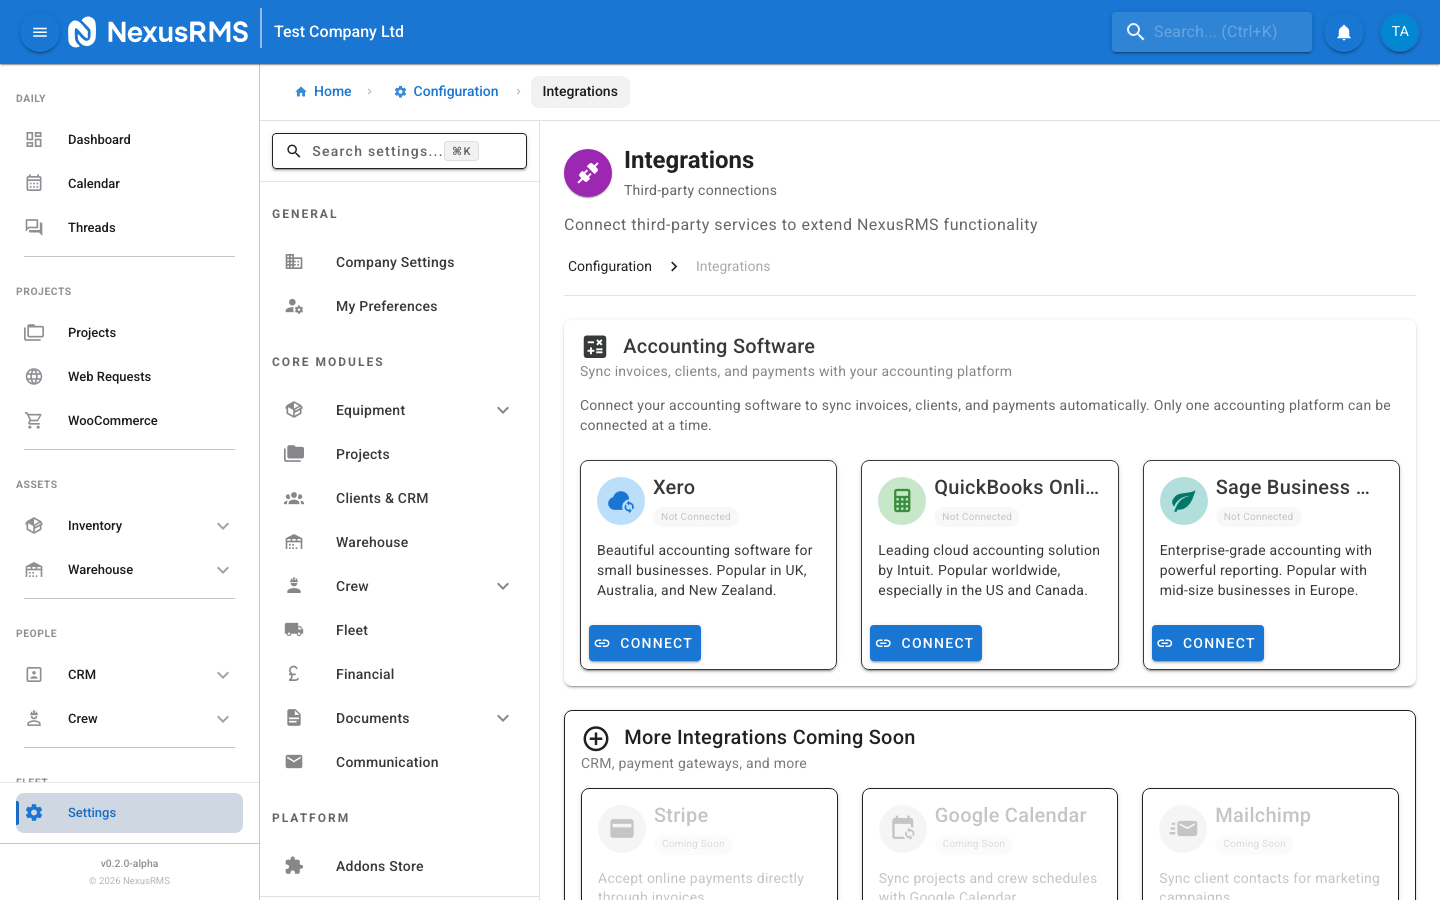
Accounting Software
NexusRMS supports integration with three accounting platforms: Xero, QuickBooks Online, and Sage Business Cloud. Only one accounting platform can be connected at a time. If you need to switch platforms, you must disconnect the current integration before connecting a new one.
Connection status
Each accounting integration card displays one of three status indicators:
- Connected (green) — The integration is active and syncing. Shows the connected platform company name and the timestamp of the last successful sync.
- Not Connected (grey) — The integration has not been set up. A Connect button is displayed.
- Error (red) — The connection has failed, typically due to an expired OAuth token or permission change on the accounting platform side. A Reconnect button is displayed.
Xero
To connect Xero:
- Click Connect on the Xero card
- You are redirected to the Xero login page
- Log in with your Xero credentials and authorise NexusRMS
- Select the Xero organisation to connect (if you have multiple)
- You are redirected back to NexusRMS with the connection confirmed
Once connected, the card displays:
- Organisation name — The connected Xero company name
- Last sync — Timestamp of the most recent data synchronisation
- Disconnect button — Removes the connection (existing synced data is preserved)
QuickBooks Online
To connect QuickBooks Online:
- Click Connect on the QuickBooks card
- You are redirected to the Intuit login page
- Log in with your QuickBooks credentials and authorise NexusRMS
- Select the QuickBooks company to connect (if you have multiple)
- You are redirected back to NexusRMS with the connection confirmed
Once connected, the card displays the connected company name, last sync timestamp, and a Disconnect button.
Sage Business Cloud
To connect Sage Business Cloud:
- Click Connect on the Sage card
- You are redirected to the Sage login page
- Log in with your Sage credentials and authorise NexusRMS
- Select your Sage business to connect
- You are redirected back to NexusRMS with the connection confirmed
Once connected, the card displays the connected business name, last sync timestamp, and a Disconnect button.
Account mappings and sync settings
Important: The Integrations page handles the connection itself. After connecting an accounting platform, account mappings and sync settings (which Xero/QuickBooks/Sage accounts map to NexusRMS income, expense, and tax categories) are configured in Configuration > Financial > Accounting Sync. You must configure account mappings before the first sync runs.
WordPress Plugin
The WordPress Plugin integration connects NexusRMS to your company's WordPress website, enabling real-time equipment availability display for your clients.
What you can configure
- API Key — A unique API key is generated for your WordPress plugin. This key authenticates requests from your website to NexusRMS. You can regenerate the key at any time (the old key is invalidated immediately).
- Plugin download — Download the NexusRMS WordPress plugin directly from this page. The plugin is also available in the WordPress plugin directory.
- Allowed domains — Restrict API access to specific domains for security. Only requests from listed domains are accepted.
- Equipment visibility — Choose which equipment categories are visible on your website. You may want to hide internal-only categories or items not available for public hire.
- Availability display — Configure how availability is shown: exact quantities, "In Stock / Out of Stock" labels, or availability calendars.
After installing and activating the plugin on your WordPress site, enter your NexusRMS API key in the plugin settings. Equipment availability data is fetched in real time and cached for performance.
Calendar Sync
Calendar sync integrations allow NexusRMS to push crew schedules, project dates, and personal assignments to external calendar applications.
Supported platforms
- Google Calendar — Two-way sync via Google OAuth. Crew members can see their NexusRMS schedules in Google Calendar, and availability blocks created in Google Calendar are reflected in NexusRMS scheduling.
- Microsoft Outlook — Two-way sync via Microsoft Graph API. Works with Outlook.com and Microsoft 365 accounts.
- Apple iCloud — One-way sync via CalDAV. NexusRMS pushes schedules to iCloud Calendar. Changes made in iCloud are not reflected back in NexusRMS.
Configuration
- Sync scope — Choose what is synced: project dates only, crew schedules only, or both.
- Default calendar — Select which calendar (within the connected account) receives NexusRMS events.
- Event details — Configure how much project detail is included in calendar events: project name only, project name and client, or full details including notes and location.
- Sync frequency — Real-time (pushed immediately when changes occur) or scheduled (every 15 minutes). Real-time is recommended for active crews.
Calendar sync is configured per user. Each crew member connects their own calendar account from their profile page. The settings on this page control the defaults and available options.
API Access
The API Access section manages your REST API keys, webhooks, and developer documentation access.
REST API Keys
- Generate API Key — Create new API keys for third-party integrations. Each key has a name/description for identification.
- Key permissions — Restrict keys to specific API scopes (read-only, read-write, specific modules). Follow the principle of least privilege.
- Key expiration — Set optional expiration dates on keys. Expired keys are automatically revoked.
- Active keys list — View all active API keys, their creation date, last used timestamp, and permissions.
- Revoke keys — Immediately revoke any key. Revoked keys cannot be reactivated; a new key must be generated.
Webhooks
- Webhook URL — Add endpoint URLs that NexusRMS will POST event data to when specific actions occur.
- Event selection — Choose which events trigger webhooks: invoice created, quote approved, equipment checked out, project status changed, and more.
- Webhook secret — A shared secret for verifying webhook signatures. NexusRMS signs every webhook payload with HMAC-SHA256.
- Delivery logs — View the history of webhook deliveries including response codes, timestamps, and retry status.
- Retry policy — Failed deliveries are retried up to 5 times with exponential backoff (1 min, 5 min, 30 min, 2 hours, 12 hours).
Rate limits
API rate limits are applied per key:
- Standard tier — 100 requests per minute, 5,000 requests per hour
- Elevated tier — Available on request for high-volume integrations. Contact support@nexusrms.io.
API documentation
A link to the full REST API documentation is provided on this page. The documentation includes endpoint references, request/response examples, authentication guides, and SDKs for common languages (PHP, JavaScript, Python).
Tips and best practices
Which integrations to set up first
- Accounting integration first — Connect your accounting platform (Xero, QuickBooks, or Sage) before you start issuing invoices. This ensures financial data flows cleanly from day one, avoiding manual reconciliation later.
- Calendar sync second — Once you start scheduling crew, calendar sync keeps everyone informed. Set this up before your first project goes live.
- WordPress plugin when ready — The WordPress integration is valuable for client-facing availability but is not critical for internal operations. Set it up when you are ready to display equipment on your website.
- API access as needed — Only set up API keys and webhooks if you have specific custom integration requirements.
Troubleshooting connection issues
- OAuth token expired — If an accounting integration shows an Error status, the OAuth token has likely expired. Click Reconnect and re-authorise. This is normal and can happen every 30–90 days depending on the platform.
- API rate limits — If your custom integration is receiving 429 (Too Many Requests) responses, you are exceeding the rate limit. Implement request queuing and backoff logic in your integration code.
- Firewall blocking — If connections fail consistently, check that your corporate firewall allows outbound HTTPS connections to the accounting platform's API endpoints. NexusRMS connects to Xero, QuickBooks, and Sage APIs on their standard HTTPS ports.
- Check the integration status page — Visit status.nexusrms.io to check whether any integration services are experiencing downtime or degraded performance.
- Multiple organisations — If you have multiple organisations in your accounting platform, ensure you selected the correct one during connection setup. Disconnect and reconnect if you chose the wrong organisation.
Next steps
Continue to the next article to learn about PAT Testing Settings, where you will configure electrical testing schedules, compliance rules, certificate templates, and IET thresholds.
Was this article helpful?